Propagating Sundews
Sundews are very unique in the fact that there are so many ways to propagate them. To propagate means to produce many plants from only one plant. Sundews can be propagated by means of seed, leaf cuttings (or pullings), flower stalk cuttings, root cuttings, divisions, or, for tuberous sundews, via tubers.I'll walk you through examples for each propagation technique.
Click the links below to be directed to that specific topic in this page.
- Growing Sundews from Seed
- Leaf or Flower Stalk Cuttings
- Establishing Sundew Leaf Cuttings, Buds, Leaf pullings, root cuttings, stem cuttings, etc.
- Leaf Pullings
- Root Cuttings
- Dividing Sundews
- Stem Cuttings
- Gemmae
- Tubers
Seed
See my in-depth Sundew Seed-Growing Guide in detail here
Seed is a very good way to produce large amounts of plants. Sundew seeds are very tiny. Some species of Drosera have such small seeds, it looks like black powder. Seeds are very commonly used in Tissue Culture since they can be easily sterilized. For most annual sundews, seed is the only method of propagation. Leaf cuttings and root cuttings don't seem to work. Most sundews produce seed through self-pollination. However, there are exceptions to this, such as the Petiolaris complex and Queensland sundews. These sundews must be cross-pollinated with another clone or with a sundew that is closely-related. Some sundew seeds germinate in only a few weeks, while some tuberous sundews can take up to 5 years to germinate. To learn how to germinate common sundew seeds, visit my Germination Guide. Some sundews can grow to maturity from seed in only 4 months.
Sundew seeds can remain viable for up to 10 years if stored in the refrigerator. The optimal storage temperature is around 4- 5 degrees Celcius.
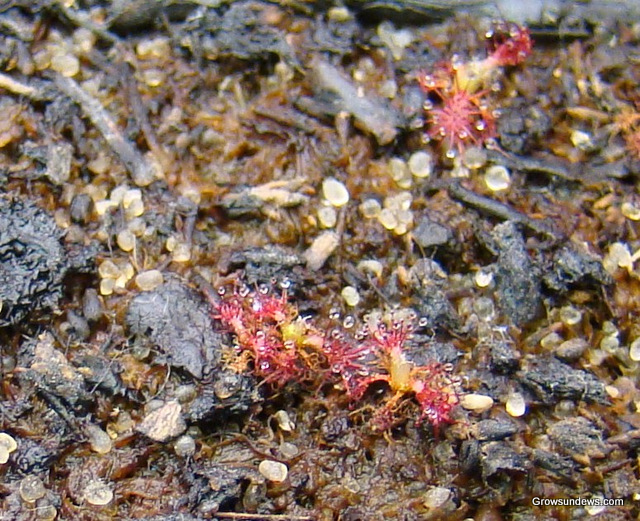
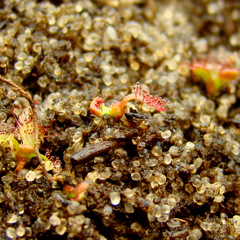
Young Drosera camporupestris seedlings. Drosera burmannii seedling after 2 months
Seed can also be used to identify the identity of unknown plants in your collection, so compare your seed to online pictures if you're having i.d. issues!
Leaf or Flower Stalk Cuttings
Leaf or Flower Stalk Cuttings are a very easy way to propagate sundews. To take a leaf cutting, cut a whole leaf, or portion of a leaf from the sundew you want to propagate. You can use the whole leaf or cut the leaf into inch long segments, if preffered. You will get similar amounts of plantlets either way. You can use this process with flower stalks, too. The flower stalk must be from a sundew that produces larger, sturdier stalks (i.e. D. binata or D. capensis) It is easier to fit the flower stalk cuttings in a container if you first cut the flower stalk into 1-inch segments or larger. Plantlets that sprout from flower stalk cuttings will be twice as large as normal leaf cuttings from the same plant.
I prefer to strike my leaf cuttings in water, but some people have more success with laying their leaf cuttings on a very moist peat/sand mix in a pot covered with saran or a dome to raise the humidity. Use whatever method that works best in your conditions.
If you go the water strike method, and plantlets have begun to emerge, OR if you have a budding sundew from a different method, the following technique will work the same for anything.
After 2 weeks-2 months, the end result will look something like the following:
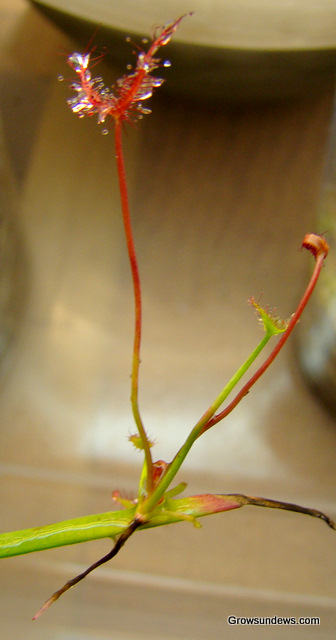
Above left: Drosera binata just taken out of a jar of water. It developed roots after ~2 months.
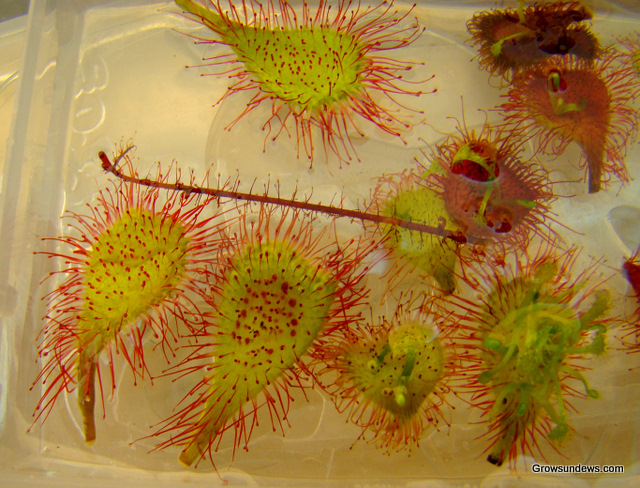
Above right: a collection of Drosera filiformis, 'Ivan's Paddle', and Rotundifolia leaves floating in water. At the time this picture was taken, most of the leaves had been floating for almost 2 weeks.
Establishing Sundew Leaf Cuttings or Buds in Media
Method 1- Indoors (Recommended) or Outdoors
Move the leaf cuttings to a soupy mix of the desired media of the parent plant (ie. 50:50 peat moss:sand or 100% dead or living sphagnum). You can create this soupy environment by using a separate tub to establish sundew plantlets, and use a high water level when using the tray method. When using this method, you will not have to seal the top of the container, as long as the soil is always soggy at the top. Give as much light as possible (I'd recommend using lights unless you want to experiment trying this outdoors. Keep the water level high until you notice new growth, or small roots protruding from the cutting. Then you can gradually lower the level until the plantlets are completely established.
Method 2- Indoors Only
To avoid using excess water, you can also use a sealed, clear, plastic cup or pot, with saran or a clear lid on the top, to keep water from evaporating. When using this method, make sure that the media is only MOIST! If the media is as soggy as in method 1, you will have tons of algae and mold. I would only recommend using 100% long-fibered sphagnum, dead or alive. (If you use living sphagnum, just be sure that it does not overgrow the small sundew plantlet. Place your sundew cutting (or budding leaf) partially under the media surface, with the bud or plantlet completely uncovered. Place the clear cup/ pot reasonably close to the lights, but make sure the container does not overheat. This method also works very well with Root cuttings, or Stem Propagation of Drosera (see below). This method is a bit less tedious if you have a good seal, but make sure you check it once a week, or so, to make sure the media stays at a good moisture level.
Leaf cuttings are a great way to propagate and produce hundreds of sundews in a relatively short time! Although it can take a while for some Drosera species, and can also be a bit tedious at times, it is a relatively simple process.
In the end, you will be rewarded with an abundance of sundews, that can look like this:
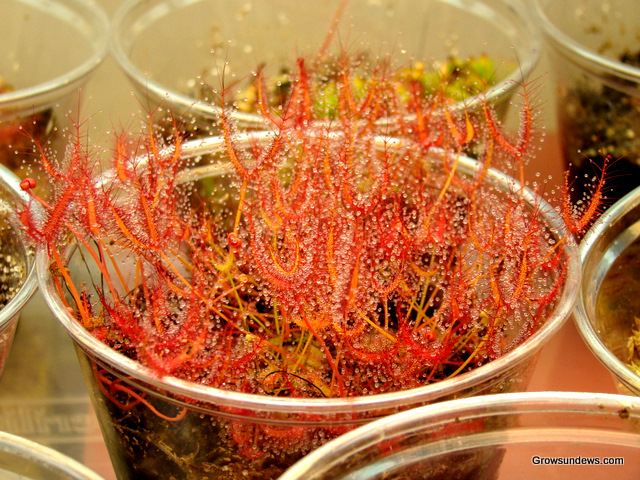
Drosera binata leaf cuttings established after less than 2 months
Leaf Pullings
The difference between taking normal leaf cuttings and taking leaf pullings explained by the titles. Generally speaking, for leaf cuttings, you can basically cut any part of the leaf into sections and they should produce plantlets (generally for larger leaves like D. adelae, D. capensis, or D. binata). For many sundews, this will not work. The sundews that need to be propagated via leaf pullings are primarily Petiolaris and pygmy sundews. However, pygmy sundews are normally propagated via gemmae, which is explained below.
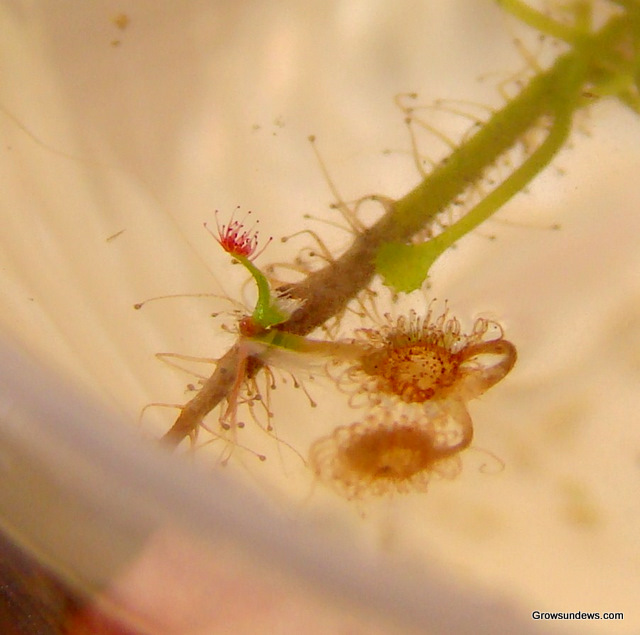
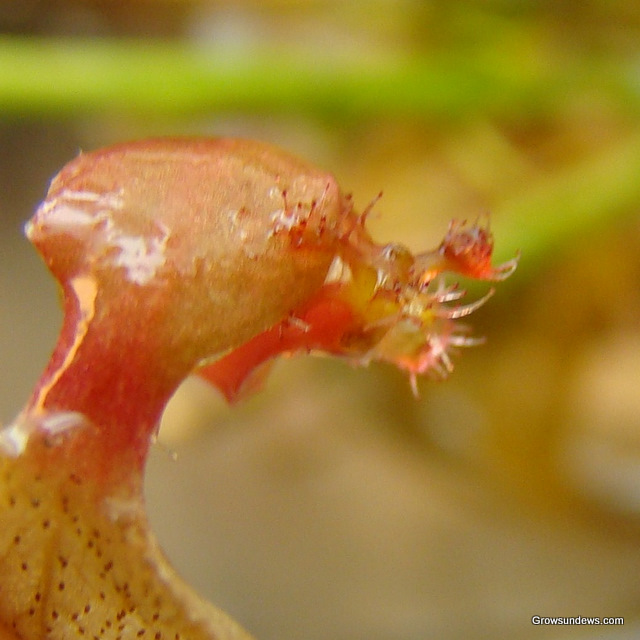
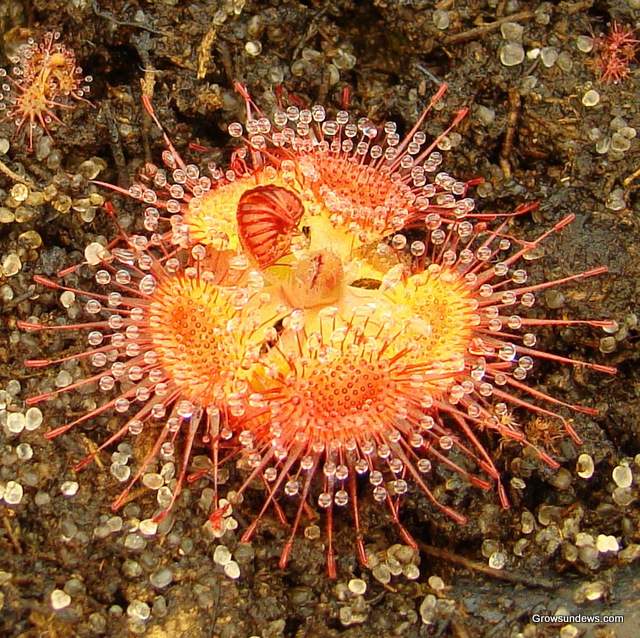
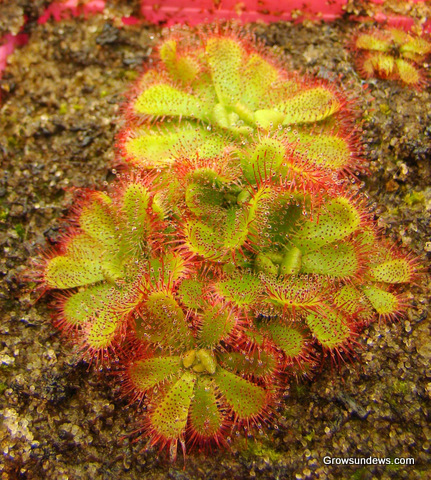
Above left: Drosera 'Lake Badgerup' leaf pulling. Above right: Drosera falconeri leaf pulling
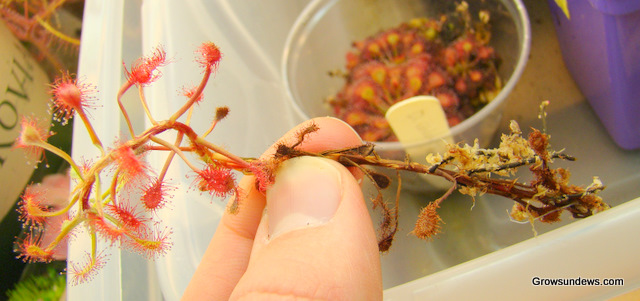
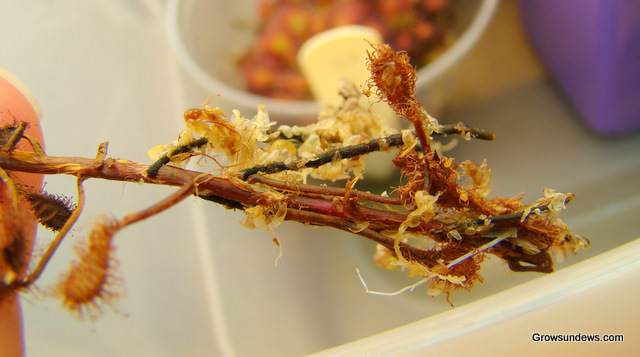
To take a leaf pulling, pull the leaf off the stalk of the plant by firmly grabbing the base of the leaf, and pull downward. In order to take a successful leaf pulling, it must contain part of the stipule- the very base of the petiole (that attaches to the stem of the plant). I've also heard success stories from people who take a razor blade and cut off the petiole from the stem, digging out a portion of the stem (or base of stipule), but this is pretty risky with fragile pygmies. It can work well with larger sundews though. After placing in water or on moist media, in a few weeks, a plantlet should sprout from the base of the stalk, where the chunk of the petiole is. It previously was a misconception that pygmies could not be propagated by leaf cuttings, but I have had great success with over 5 different varieties of pygmy sundews. Note: it is easiest to propagate pygmy sundews by planting gemmae, and you could risk uprooting your plant if you are not careful when taking pygmy leaf pullings See the pictures to the right to see what leaf pullings look like after a few short weeks. Once plantlets sprout, treat them the same as you would with normal leaf cuttings.
Root Cuttings
Root cuttings are by far the fastest way to obtain adult plants by means of propagation. Root cuttings will only work on thick-rooted Drosera species such as: D. adelae, D. admirabilis, D. binata, D. capensis, or D. falconeri. Examples of sundews that won't work are Pygmy sundews, or annual sundews (i.e. D. burmannii or D. indica). When taking root cuttings, make sure the plant has at least a 2-inch root, or else, you may end up killing the mother plant in the process. You can cut the root cutting into sections, or leave the strand as a whole unit. You can set up a root-cutting propagation container in 1 of 4 ways:
Sundew Root Cuttting Propagation Method 1
Set up a root cutting propagation container, by following the same steps as Sundew Leaf Cutting Establisment, as described above. You can place the roots partially buried on the surface of the media (soil), or you can bury them about a half inch from the media surface. The surface method works pretty much all the time, and is required for the more "picky" Drosera (propagation-wise). Easier propagatable sundews, such as Drosera adelae, Drosera aliciae, Drosera capensis, or Drosera admirabilis, can have their root cuttings buried an inch+ below the media surface, and they will still pop up.
Sundew Root Cutting Propagation Method 2
You can place the roots in a plastic ziploc bag, with a little bit of moist media, and place the bag as close to the lights as you feel comfortable with. This method works well for pretty much all sundews.
Sundew Root Cutting Propagation Method 3
Easy Method USE ONLY for propagating the easier-to-grow sundews-
Take your root cuttings, and prepare a normal-sized (4-5 inches tall) pot with media (50:50 peat:sand or pure LFS or a mix that you like) and then bury them a fourth- to a half-inch below the media surface. Keep the pot in the same conditins as you would keep your other sundews, and give plenty of light. This method is very easy, because you don't have to transplant the cuttings for a long time, and you may be able to grow them for years in that same pot, considering your growing conditions are great.
Sundew Root Cutting Propagation Method 4
Propagating sundew roots in water only- somewhat riskier.
Take a clear plastic cup, fill with distilled or tap water, and place the roots (MUST be cleaned first) in the water. Seal the container with saran or a clear lid. Place directly under the lights, without allowing the temperature to cook the roots. This method works well for pretty much all sundews (including Drosera regia) but you HAVE to make sure you get them transferred to a moist media setup immediately after they bud out plantlets or else they will mold a while after this.
There are 2 Ways to place the roots into the media
1. If you place the root cutting horizontally on the surface, many smaller-sized plants will emerge (This is what I did with D. admirabilis in the pics below).
2. If you plant the root cutting vertically into the soil (as though it were the roots of a normally growing plant), you will obtain 1 or 2 much larger plants that will reach adulthood much more quickly.
Drosera admirabilis (Ceres R.S.A) root cuttings- above left was taken after waiting for one month. The above right picture was taken 7 months later after feeding once a month.
Divisions
For More Detailed Information, please check out this entire page devoted to Repotting and Dividing Sundews
Many sundews have a tendency to form clumps of plants around a "mother plant." Over time, the clumps can get very thick, so it is best to divide them before they start crowding each other. First, remove the entire rootball and plants from the pot. Many times, you will be able to easily pull the plants apart, but sometimes the plants may be fused at the stalk. In this case, you may need to use a razor to separate them, or if you are not very daring, then you can put them back in the pot. Once you have carefully separated the plants, place them into individual pots. For some Petiolaris complex sundews, it is possible to divide the plant at the crown into sections with a razor. As long as some of the roots are still attached, each section should be able to grow and form individual plants.
Sundew Stem Cuttings
(for sundews such as D. madagascariensis or other stem-forming sundews)
Part 1 (stem cutting)
If you have a sundew that is growing rather tall, or you're willing to take a bit of a risk, you can cut the stem of your sundew a little above the point where the leaves are beginning to die. You want the newer growth when using this method. Then place the stem cutting in the same
setup as described for leaf cuttings, method 2. (ie. in a clear, sealed container with moist media). You will want to stick the stem a significant amount into the media surface, so that it doesn't dry out. Also, roots will many times pop out from the length of the stem that is buried.
It can take a while for some plants to grow new roots from the bottom of the stem (where you made the cut), but for the most part, this is a fail-proof method.
D. madagascariensis stem cutting after 2 months. Observe the roots in the top right photo
BONUS Part 2 (plantlets from the remaining roots)
After potting up the stem cutting, you can trim the rest of the sundew stem remainders (left in the original pot) down to the media (soil) surface, and eventually a clump of plantlets will also pop up from the roots of the sundew. Just make sure to keep the original pot wet, as though you were growing a live sundew plant in the "empty" pot. If you would rather transfer everything to a new pot, you can also take root cuttings of the root clump that is left when you cut off the
sundew stem in part 1, and follow the directions for sundew root cuttings, given above.
Good luck!
Gemmae
Gemmae are small reproductive bodies only produced by pygmy sundews, from Australia (gemma is singular). Gemmae are also referred to as "brood bodies" since they are modified leaves, made only for the purpose of creating a new sundew, which is genetically identical to the parent. Gemmae are produced in the crown of the rosette. Gemmae production is triggered by primarily by a shorter photoperiod. Sundew growers that raise pygmy sundews indoors often gradually reduce the photoperiod to below 10 hours to trigger gemmae production. For some species, you may find that cooler temperatures (around 70-73 F or below) are required before gemmae will be produced.
While pygmy sundews can be propagated via leaf pullings, there is a risk of uprooting the plant while you are trying to tear off part of the stipule along with the stem and leaf of your pygmy.
Storing gemmae
After experimentation, I have found that gemmae can be stored in the refrigerator if it is kept submerged or floating in water. Since water tends to evaporate from larger cups, I have found that medium test tubes work the best. Simply collect your gemmae in the tube and then fill the test tub 3/4 of the way up with water. Seal the top off with tape or a non-adhesive if you are worried about gemmae sticking to it. Then find a way to keep the test tube upright in the refrigerator. It helps if you have a lot of test tubes in a small cup or container to support each other. The refrigerator should be at about 37-40 degrees Farenheit. You don't want your gemmae to freeze and warmer temps cause the gemmae to sprout more quickly. You can also store gemmae on a moist paper towel, but when the roots sprout after a month, they will get entangled in the towel. In water, they do not get tangled.
Media preparation
To grow pygmy sundews from gemmae, you will want to use a sand:peat mix most of the time. Pygmy sundews prefer tall pots since their roots are extremely long and thin. Pot size is up to you, but I normally use a 8 inch pot. If no pots are available to you, use a 2 Liter Pop bottle, and cut off the top curving part to get a tall pot.
After trial and error, I now normally use a 1 inch layer of silica sand on the surface of my media for pygmies. This is not required, but it can reduce algae and moss growth. You can use a 1 peat: 1 sand mix for most pygmy sundews, and you can add perlite to your discretion.
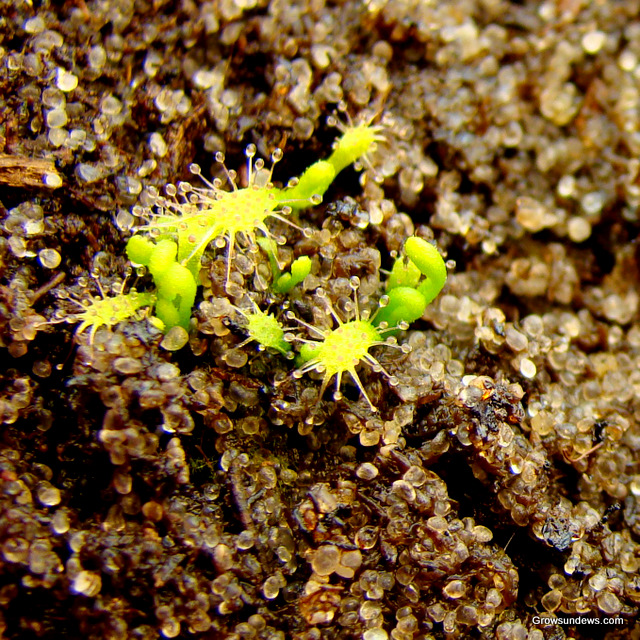
Getting your Gemmae to bud (or sprout)
I normally wrap the top of my gemmae-sprouting pot with saran to raise humidity and warmth as much as possible. I then place the surface of the pot as close to fluorescent lights as possible. I also try to keep a water level that is higher than normal for this individual pot, to make sure the gemmae doesn't dry out (especially if you use a layer of sand at the media surface. For example, I might use a water level of 3 inches for a pot that is 8 inches tall.
The sprouting process should take about a week or more. Once the gemmae forms 3 or 4 leaves and the baby pygmy sundews are established, you can lower the water level back to an inch or less.
Some pygmy sundews are harder to grow from gemmae than others, so for individualized species preferences, check out these links:
http://www.cephalotus.net/article.aspx?cid=1&y=2001&m=9&d=12
http://www.cephalotus.net/article.aspx?cid=12&y=2001&m=10&d=17
Tubers
I am yet to grow a tuberous sundew, so I don't have any experience in this area. I'll list some general info I've picked up from reading I've done...
Every year, tuberous sundews die back during the dry season. During this time, they form tubers (or bulb-like structures) under the soil. Many times, a plant will produce multiple tubers. You can dig the tubers out and trade them, or plant them in another pot. Keep the soil drier during the tuber-formation period or the tubers will rot.
Additional Questions or Suggestions?
Contact me at: sundewman(at)yahoo.com